Water damage remediation and restoration involve a series of critical steps designed to mitigate damage, prevent long-term issues like mold growth, and restore the affected area to its original condition. Understanding what to expect during this process can help you feel confident and prepared should you ever face water damage in your home or business.
1. Initial Assessment and Inspection
The first step is assessing the extent of water damage. Professionals will:
– Identify the source of the problem (e.g., burst pipes, flooding, appliance malfunction).
– Evaluate the scope of the damage using moisture meters, thermal imaging cameras, or other tools.
– Categorize water contamination levels (clean water vs. gray/black water) to determine appropriate remediation techniques.
A detailed assessment ensures that all affected areas are identified—visible and hidden—to prevent future structural issues or mold growth.
2. Water Extraction
Once assessed, removing standing water is a priority to prevent further damage:
– Specialized Pumps: Industrial-grade pumps are used for significant amounts of water.
– Wet/Dry Vacuums: For smaller areas or less severe flooding, vacuums may suffice.
Quick action during this phase reduces the risk of structural deterioration and helps expedite drying.
3. Drying and Dehumidification
After extraction, technicians dry out the area thoroughly:
– High-powered dehumidifiers pull moisture from walls, flooring, furniture, and air.
– Air movers circulate air to speed up drying time.
This stage may take several days depending on factors such as humidity levels, materials affected (e.g., hardwood vs. carpet), and overall severity.
| Material | Average Drying Time | Additional Notes |
| Drywall | 24–48 hours | May need replacing if soaked through |
| Hardwood Flooring | 7–10 days | Requires precision drying to prevent warping |
| Carpets & Padding | 1–3 days | Padding often needs replacement after saturation |
Technicians monitor progress daily using moisture meters until target dryness levels are achieved.
4. Cleaning and Sanitization
Cleaning is vital for health reasons—especially if gray or black water was involved:
– Antimicrobial Treatments: Applied to inhibit bacterial or mold growth on surfaces like walls or furniture. – Odor Removal: Deodorization techniques eliminate musty smells caused by moisture retention. – Content Cleaning: Items such as furniture or personal belongings may be cleaned off-site using specialized equipment like ultrasonic cleaners.
Proper sanitization restores a safe living environment while preventing contaminants from spreading further.
5. Repairs and Restoration
Once dry and sanitized, repairs begin based on the level of damage: – Minor repairs include patching drywall or refinishing floors. – Major restoration might involve replacing entire sections of flooring, insulation removal/replacement, or rebuilding walls.
The goal is to restore your property not only structurally but also aesthetically so it looks pre-damage condition again.
Final Thoughts
Water damage remediation requires expertise across multiple stages—from extraction through full restoration—to achieve long-lasting results effectively while minimizing risks such as mold development post-cleanup efforts
Effective Mold Removal Florida: Signs, Risks, and Solutions for Crawl Space Mold After Water Damage
A crawl space is one of the most vulnerable areas in a property when it comes to water damage. Due to its location and typically poor ventilation, water intrusion can easily lead to mold growth if not addressed promptly. Understanding the signs, risks, and proper removal techniques is crucial for maintaining a healthy and safe environment in your home or business.
Signs of Mold in the Crawl Space
- Musty Odors: A persistent musty smell may indicate mold growth, even if it’s not visible.
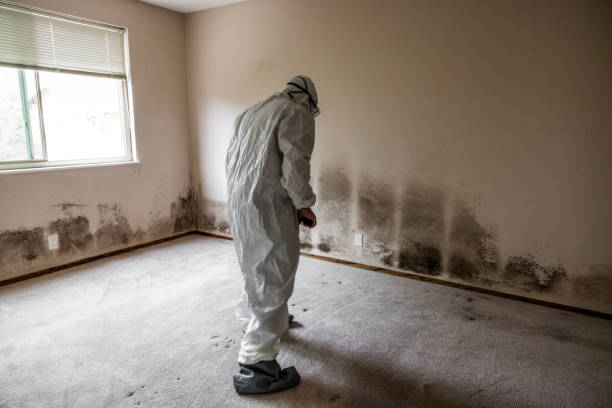
- Visible Mold Growth: Look for black, white, green, or gray patches on wood beams, insulation materials, or walls.
- Increased Allergy Symptoms: Sneezing, coughing, headaches, or respiratory issues among household members may suggest mold contamination.
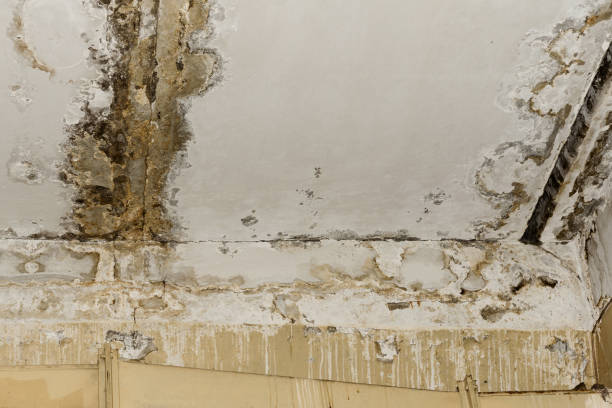
- Warped Wood or Structural Changes: Excess moisture from mold can cause wooden structures to warp over time.
- Pest Infestation: A damp environment attracts pests like rodents and insects that thrive in similar conditions as mold.
Risks of Ignoring Crawl Space Mold
- Structural Damage: Mold gradually weakens wooden beams, joists, and insulation materials over time.
- Health Issues: Prolonged exposure to mold spores can cause respiratory problems such as asthma or bronchitis.
- Reduced Property Value: Mold infestations left untreated decrease the value of your home during resale inspections.
- Energy Inefficiency: Dampness impacts insulation efficiency, leading to higher energy costs for heating and cooling.
Steps for Effective Crawl Space Mold Removal
- Check every corner of the crawl space using appropriate lighting tools.
- Identify leaks or water intrusion sources contributing to excess moisture levels.
- Repair leaks from foundation cracks or plumbing systems immediately.
- Install a vapor barrier across the ground surface to minimize dampness.
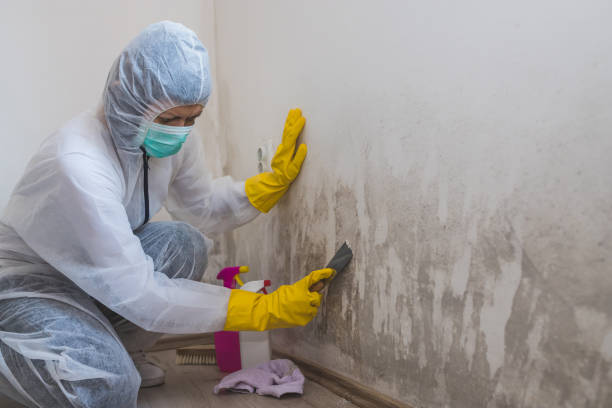
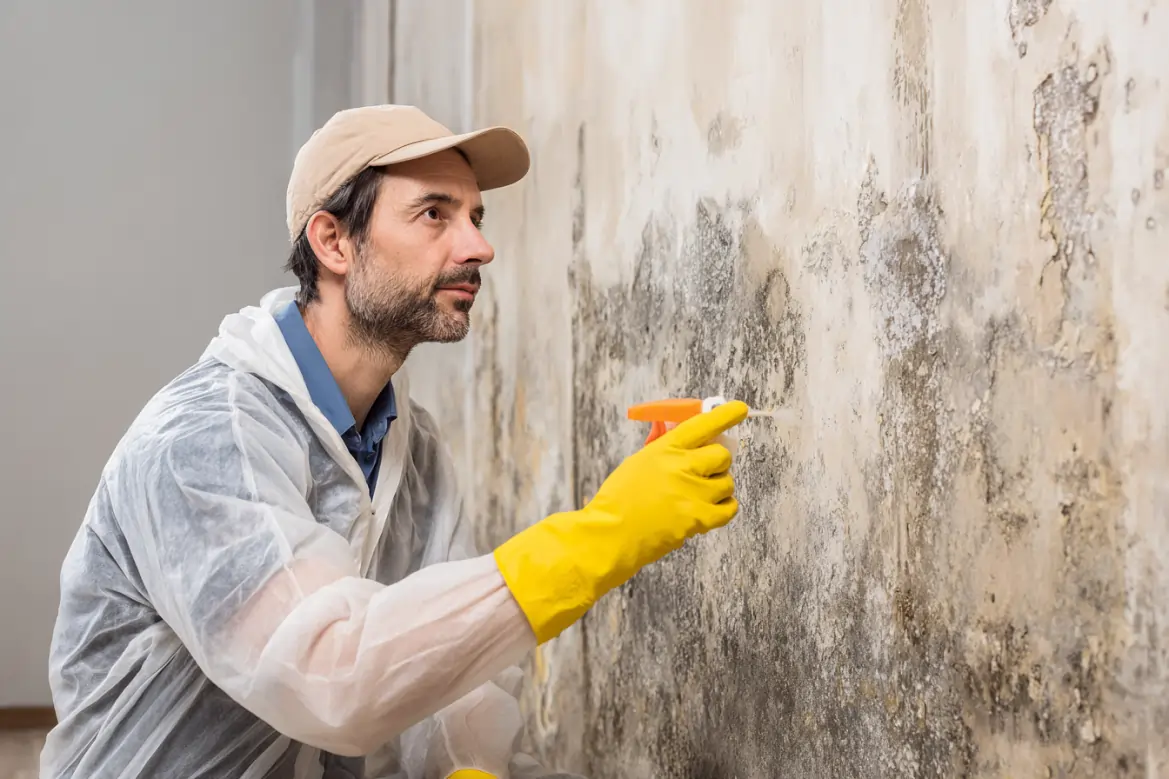
- Use an EPA-approved antifungal cleaner suitable for wood and other surfaces.
- Scrub affected areas with a stiff brush while wearing protective gear like gloves and masks.
- Ensure adequate air circulation by installing vents or fans within the crawl space.
- Consider using a dehumidifier specifically designed for damp environments.
- Apply caulking around gaps near pipes or wiring that allow moisture entry.
- Regularly inspect your crawl space for signs of recurring moisture issues.
- Test humidity levels periodically with a hygrometer (recommended range: 30–50%).
| Step | Action Required | Benefit |
| Inspect | Identify problem areas | Prevents oversight during remediation |
| Address Moisture | Repair leaks; install vapor barriers | Eliminates root causes |
| Clean | Use antifungal cleaners; scrub surfaces | Removes active mold colonies |
| Ventilate | Add vents/dehumidifiers | Reduces long-term humidity levels |
| Seal | Close cracks/gaps | Blocks water reentry |
| Monitor | Regular inspections | Ensures long-term success |
Professional Assistance vs DIY Mold Removal
While minor cases of surface-level mold may be handled independently with proper tools and techniques, hiring professionals is recommended for extensive infestations due to health risks involved during cleanup efforts.
A licensed mitigation expert will:
– Perform air quality tests before/after cleanup operations ensuring safe conditions – Utilize industrial-grade HEPA vacuums & negative pressure containment methods ensuring containment throughout remediation
By acting promptly & addressing both symptoms alongside root causes simultaneously—you protect both family health well-being asset upkeep effectively
Effective Mold Removal Services Florida: Signs, Risks, and Solutions for Crawl Space Mold After Water Damage
Water damage in your home or business can lead to one of the most troublesome issues: mold growth in crawl spaces. This hidden area often becomes a breeding ground for mold due to its dark, damp, and poorly ventilated environment. Understanding the signs of mold, the risks it poses, and how to address it effectively is crucial for maintaining a safe and healthy property.
How to Choose the Best Mold Removal Company Florida for Crawl Space Issues
- Musty Odors: A persistent earthy or musty smell coming from the crawl space may indicate mold.
- Visible Mold Colonies: Dark spots or stains on wooden beams, insulation, or other surfaces could be an indicator of active growth.
- Increased Allergy Symptoms: Unexplained respiratory issues like sneezing, coughing, or congestion among household occupants may be linked to mold spores.
- High Humidity Levels: Excess moisture in crawl spaces creates an environment conducive to fungal growth.
- Peeling Paint or Warped Materials: Moisture buildup due to water damage can cause materials in the crawl space to warp or paint to bubble and peel.
Understanding Water Damage Restoration Florida: Risks of Crawl Space Mold
- Prolonged exposure to mold spores can trigger allergies, asthma attacks, skin irritation, and other respiratory problems.
- Vulnerable individuals such as children, elderly persons, or those with immune deficiencies are at higher risk.
- Over time, mold feeds on organic materials like wood. This weakens support structures such as floor joists and beams.
- Insulation may become compromised or deteriorate due to prolonged exposure.
- Homes with a history of water damage and unresolved mold issues often lose value during inspections.
Essential Steps for Mold Inspection Florida and Effective Removal
1. Assessment
Hire a professional water damage restoration expert who can assess the extent of the issue using moisture meters and infrared cameras.
2. Containment
To prevent cross-contamination: – Seal off affected areas using plastic sheeting. – Use HEPA air filtration systems during remediation.
3. Mold Removal Techniques
Depending on the severity: – Scrub non-porous surfaces with detergent solutions approved for microbial removal. – Use antimicrobial sprays post-cleaning on wood beams or concrete walls. – Dispose of porous materials like insulation that cannot be cleaned effectively.
4. Address Moisture Sources
To avoid recurrence: – Repair leaks from plumbing systems or cracks in foundations. – Install vapor barriers for additional protection against rising ground moisture.
| Issue | Solution |
| High Humidity | Install dehumidifiers |
| Poor Ventilation | Add vents if building codes permit |
| Standing Water | Ensure proper drainage around property |
5. Post-Cleanup Validation
Request air quality testing post-remediation to ensure that harmful spore levels are within safe limits.
Preventing Future Mold Growth
- Regular Inspections Check crawl spaces biannually for potential water intrusion signs.
- Maintain Proper Ventilation Ensure proper air circulation by keeping vents unobstructed.
- Monitor Humidity Levels Keep indoor humidity below 50% using dehumidifiers if necessary.
By addressing both immediate concerns and underlying causes of moisture buildup, you can protect your property from future infestations while ensuring a healthier living environment.
Why Does My House Smell? Identifying Mold Growth and Steps for Removal
A persistent, unpleasant smell in your home can be a frustrating and concerning issue. Often, these odors are caused by mold growth, which thrives in damp or humid conditions. Identifying the source of the smell and addressing mold growth promptly is essential to maintaining a healthy indoor environment. Below, we’ll explore the common causes of mold-related odors, how to identify the growth, and actionable steps for removal.
Common Causes of Mold-Related Odors
- Basements: Poor ventilation and high humidity levels make basements prime locations for mold growth.
- Bathrooms: Persistent moisture from showers or leaks can create the perfect breeding ground for mold.
- Kitchens: Leaky pipes under sinks and wet dish sponges can lead to hidden mold issues.
- Crawl Spaces: Limited airflow and potential water damage in crawl spaces encourage mold to thrive.
- HVAC Systems: Mold in air ducts can circulate unpleasant smells throughout your home.
Signs of Mold Growth
- Black, green, or white spots on walls, ceilings, or other surfaces.
- Discoloration on drywall or wallpaper.
- Fuzzy textures on organic materials like wood or fabrics.
- Allergic reactions such as sneezing, coughing, or itchy eyes when indoors.
- Worsening asthma symptoms due to airborne spores.
- A consistent musty smell that doesn’t go away even with cleaning efforts.
- Past flooding or leaks may lead to hidden mold growth behind walls or under floors.
Steps for Removing Mold
- Locate the Source: Begin by identifying where moisture is entering your home (e.g., roof leaks, plumbing issues). Fixing water-related problems is crucial before removing the mold itself.
- Use plastic sheeting to isolate the affected area from other parts of your home.
- Prevent spreading spores by turning off HVAC systems during cleanup.
- Small patches of surface-level mold can be cleaned with soap and water or a mixture of vinegar and baking soda.
- For more severe cases involving porous materials (like drywall), consider replacing affected sections entirely.
- Wear Protective Gear: During remediation work, wear gloves, goggles, an N95 mask (or similar), and long sleeves/pants to reduce exposure risks.
- Improve Ventilation: Use dehumidifiers, fans, or open windows during drying stages after cleaning up any excess water sources.
- Professional Remediation Services: If the infestation covers over 10 square feet or involves hazardous black molds such as Stachybotrys chartarum, consult professional services equipped with specialized tools like HEPA vacuums.
Preventing Future Mold Growth
| Prevention Method | Description |
| Control Indoor Humidity | Maintain indoor humidity below 50% using dehumidifiers if necessary. |
| Repair Leaks Promptly | Fix plumbing leaks immediately before they escalate. |
| Improve Air Circulation | Regularly open windows/doors while using exhaust fans where needed. |
| Monitor High-Risk Areas | Check basements/crawl spaces periodically after storms/floods. |
Why Does My House Smell? Identifying Mold Growth and Steps for Removal
A persistent unpleasant smell in your home can often be a sign of hidden mold growth. Mold thrives in damp, dark, and humid environments, and if left unchecked, it can lead to structural damage and health issues. Understanding the causes of this odor and addressing it promptly can protect both your home and your well-being.
Common Signs of Mold Growth
- Musty Odor: A strong, earthy smell is one of the primary signs of mold presence. It often intensifies in specific areas or rooms.
- Visible Discoloration: Black, green, white, or even orange spots on walls, ceilings, or other surfaces indicate mold colonies.
- Increased Allergy Symptoms: If you or anyone in your household experiences sneezing, coughing, watery eyes, or skin irritation indoors but not outside the home.
- Warped Surfaces: Moisture created by mold growth can cause wooden surfaces to warp or paint to bubble.
Common Locations for Mold Growth
| Location | Why It’s Susceptible | How to Check |
| Bathrooms | High humidity from showers | Inspect grout lines, under sinks |
| Basements | Poor ventilation and dampness | Look at wall corners and near windowsills |
| Attic Spaces | Roof leaks | Check insulation and roofing materials |
| Kitchens | Plumbing leaks | Examine under sinks and behind appliances |
| HVAC Systems | Condensation buildup | Have ducts professionally inspected |
Steps for Mold Removal
- Wear appropriate protective gear such as gloves, goggles, and an N95 respirator mask.
- Ensure proper ventilation by opening windows or running exhaust fans.
- Fix underlying problems like leaking pipes or unsealed windows.
- Use a dehumidifier to reduce indoor humidity levels below 60%.
- For non-porous surfaces like tiles or glass:
- Mix one cup of bleach with one gallon of water.
- Scrub with a brush until all visible mold is removed.
- Consider replacing severely affected areas as cleaning may not fully remove spores.
- Professional Remediation for Severe Cases: If mold covers an area larger than 10 square feet or has penetrated deep into materials like wood or carpeting, contact professionals experienced in mold remediation.
- Repair leaks promptly.
- Maintain good airflow throughout your home by using fans or air purifiers.
- Regularly inspect vulnerable areas such as basements and attics.
When to Seek Professional Help
- Extensive mold covering large areas
- Recurring issues despite previous cleaning attempts
- Health symptoms aggravated by suspected exposure
Professional remediation teams use specialized equipment like HEPA vacuums and advanced moisture meters to ensure thorough cleaning while preventing further contamination. www.evercleanmoldremoval.com
By identifying sources early on and taking appropriate action against mold growth promptly, you can eliminate unpleasant odors while improving indoor air quality for everyone in your home.
- What to Expect During a Mold Remediation Florida Project
- Comprehensive Guide to Mold Remediation Florida: Effective Steps and Treatments
- Effective Solutions from a Trusted Mold Removal Company Florida for Protecting Books
- Essential Guide to Mold Removal Florida: Effective Techniques for Cleaning Contaminated Home Contents
- Effective Mold Removal Services Florida: Treating and Preventing Mold Behind Baseboards
- Comprehensive Guide to Mold Removal Services Florida Residents Can Trust
- Effective Tips for Mold Remediation Florida: Prevent Bathroom Mold Growth